aprilaire thermostat install manual
Aprilaire Thermostat Installation Manual: A Comprehensive Guide
This manual details the installation of Aprilaire thermostats, including wiring, mounting, and configuration, ensuring optimal HVAC system control and indoor air quality management.
Aprilaire thermostats represent a significant advancement in home comfort and indoor air quality control. Designed for precision and reliability, these thermostats seamlessly integrate with various HVAC systems, offering homeowners enhanced control over temperature, humidity, and ventilation. Aprilaire’s commitment to innovation extends to smart home compatibility, particularly with systems like Control4, allowing for centralized management of home environments.

This guide provides a comprehensive walkthrough of the installation process, from pre-installation planning and wiring to post-installation configuration and troubleshooting. Whether you’re a seasoned professional or a confident DIY enthusiast, this manual will equip you with the knowledge to successfully install and optimize your Aprilaire thermostat for years of dependable performance.
Understanding Aprilaire Models (e.g., 8570)
Aprilaire offers a diverse range of thermostats tailored to different needs and HVAC system configurations. The 8570 model, for instance, is a programmable thermostat known for its advanced features and compatibility with Control4 smart home systems. Key specifications include precise temperature control, humidity management, and optional outdoor temperature sensor integration.
Understanding the specific model is crucial before installation. Each model may have unique wiring requirements, dip switch settings, and configuration options. Referencing the model-specific documentation, alongside this general guide, ensures a smooth and accurate installation process. Familiarizing yourself with the thermostat’s capabilities maximizes its potential for enhancing home comfort and energy efficiency.
Safety Instructions & Precautions
Prioritizing safety during Aprilaire thermostat installation is paramount. Always disconnect power to the HVAC system at the breaker box before commencing any wiring work to prevent electrical shock. Exercise caution when handling wiring, ensuring connections are secure and properly insulated.
This installation should ideally be performed by a qualified HVAC technician. If self-installing, thoroughly review all instructions and adhere to local electrical codes. Improper wiring can damage the thermostat or HVAC equipment, potentially creating a fire hazard. Always consult the warranty information for specific safety guidelines and avoid operating the system if any issues arise post-installation.
General Safety Guidelines
Before beginning, carefully read this entire manual and the accompanying documentation. Wear appropriate safety glasses to protect your eyes from debris during installation. Keep the work area clean and well-lit to prevent accidents. Ensure all tools are in good working condition and used correctly.
Do not attempt modifications to the thermostat or its wiring beyond the instructions provided. If unsure about any step, consult a qualified HVAC professional. Keep this manual readily available for future reference and troubleshooting. Proper installation minimizes risks and ensures long-term, safe operation of your Aprilaire thermostat.
Electrical Safety Considerations
Always disconnect power to the HVAC system at the breaker box before commencing any wiring work. Verify the power is off using a non-contact voltage tester. Never work with live wires. If you are uncomfortable working with electrical wiring, consult a qualified electrician.
Ensure all wiring connections are secure and comply with local electrical codes. Improper wiring can cause electrical shock, fire hazards, or damage to the thermostat and HVAC equipment. Double-check all connections before restoring power. Use appropriately sized wire connectors and follow all safety precautions diligently.

Pre-Installation Planning
Careful planning is crucial; verify wire compatibility, select an optimal mounting location avoiding obstructions, and consider the optional outdoor temperature sensor installation.
Wire Requirements & Compatibility
Before beginning installation, thoroughly assess your existing HVAC system’s wiring. Aprilaire thermostats generally require a common wire (C-wire) for consistent power, though some models may function without one using power-stealing techniques.
Ensure your wiring conforms to low-voltage standards (typically 24VAC). Compatibility depends on your HVAC system type – conventional, heat pump, or multi-stage.
Verify wire gauge is appropriate for the thermostat terminals. Incorrect wiring can lead to malfunction or damage. Consult the thermostat’s specific model documentation for detailed wire color-coding and terminal assignments.
If unsure about compatibility, consult a qualified HVAC technician to avoid potential issues and ensure a safe and functional installation.
Selecting a Mounting Location
Choosing the right location is crucial for accurate temperature readings and optimal thermostat performance. Avoid areas exposed to direct sunlight, drafts, or near heat-generating appliances.
Mount the thermostat on an interior wall, approximately 5 feet above the floor, in a central location within the living space.
Ensure good air circulation around the thermostat. Avoid placing it behind furniture or curtains that could obstruct airflow.
Consider accessibility for programming and adjustments. A convenient location simplifies daily operation and maintenance.
Optimal Placement for Accuracy
For precise temperature sensing, select an interior wall away from direct sunlight, windows, and exterior doors. These elements can skew readings and impact HVAC performance.
Avoid locations near heat sources like fireplaces, lamps, or kitchen appliances, as they introduce localized warmth. Similarly, steer clear of cold drafts from vents or poorly insulated areas.
A central hallway or living room wall, approximately five feet from the floor, generally provides a representative temperature.
Ensure unobstructed airflow around the thermostat for reliable and consistent measurements.
Avoiding Interference & Obstructions
Proper thermostat placement requires minimizing potential interference. Do not install the thermostat directly in front of lamps, televisions, or other heat-generating electronics. These devices emit warmth that can falsely elevate temperature readings.
Ensure furniture, curtains, or décor do not block airflow around the thermostat. Restricted circulation prevents accurate sensing of the room’s true temperature.
Keep the area immediately surrounding the thermostat clear of clutter.
Avoid locations prone to drafts or significant temperature fluctuations, ensuring consistent and reliable operation of your HVAC system.
Outdoor Temperature Sensor (Optional)
An optional outdoor temperature sensor enhances thermostat functionality by providing accurate external temperature data. This allows for optimized heating and cooling cycles, improving energy efficiency and comfort.
The sensor typically mounts on an exterior wall, shielded from direct sunlight and precipitation. Proper placement is crucial for reliable readings.
Wiring the sensor requires running a low-voltage cable from the thermostat to the sensor location.
Consult the specific model’s wiring diagram for correct terminal connections.
Accurate outdoor temperature readings enable advanced control strategies, like economizer operation.
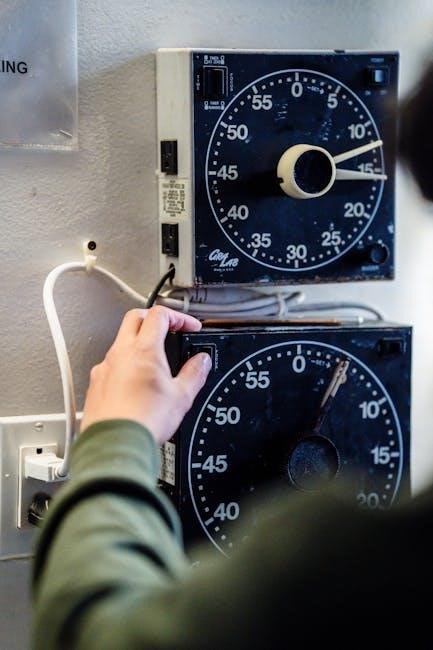
Thermostat Installation Steps
Begin by carefully opening the thermostat, mounting the base securely to the wall, and setting the configuration dip switches for your specific HVAC system.
Opening the Thermostat
Carefully unpack your new Aprilaire thermostat and inspect it for any visible damage that may have occurred during shipping. Gently open the thermostat housing, typically by releasing clips or screws located on the sides or bottom of the unit.
Avoid applying excessive force, as this could potentially damage the internal components. Once opened, familiarize yourself with the layout of the thermostat’s internal components, including the circuit board, display, and wiring terminals.
Take note of the location of the configuration dip switches, which will be crucial for customizing the thermostat to your specific HVAC system.
Mounting the Thermostat Base
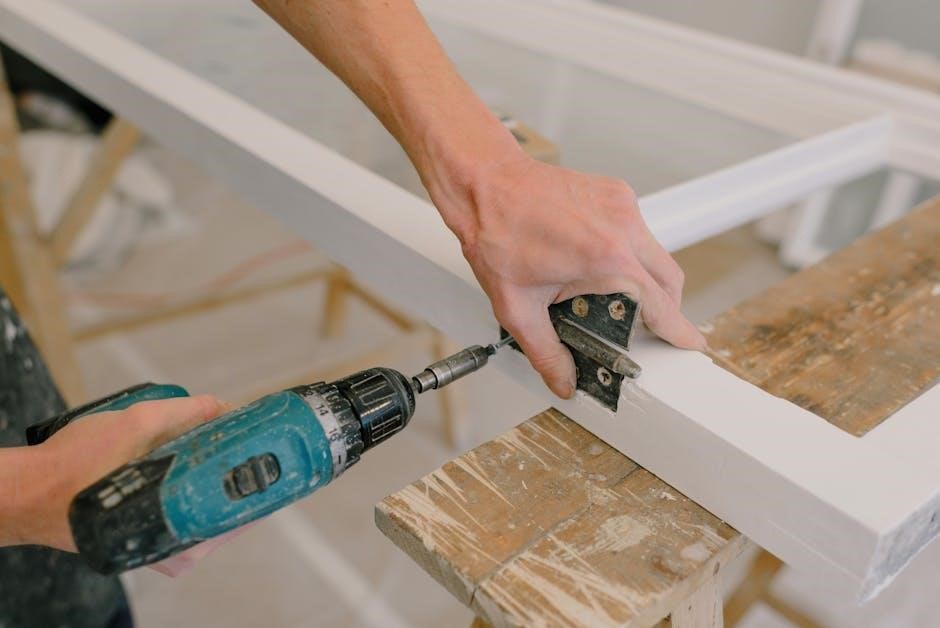
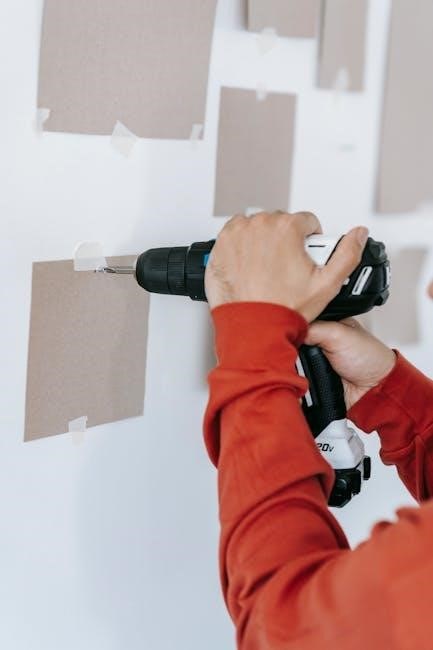
After opening the thermostat, detach the baseplate from the main unit. Position the baseplate on the wall at your desired location, ensuring it’s clear of obstructions. Use a level to guarantee a perfectly horizontal installation, crucial for accurate temperature readings.
Mark the screw holes with a pencil, then drill pilot holes if necessary, depending on your wall material. Secure the baseplate to the wall using the provided screws, ensuring they are firmly tightened but not overstressed.
Double-check the level again after securing the base to confirm proper alignment.
Securing the Base to the Wall
Once pilot holes are drilled, carefully align the thermostat base with the marked locations on the wall. Utilize the screws provided in the installation kit – avoid using alternative fasteners as they may not be compatible.
Begin screwing in each screw partially before fully tightening them, ensuring the base remains level during the process. Avoid over-tightening, which could damage the baseplate or the wall surface.
Confirm the base is firmly attached and doesn’t wobble. A secure mount is essential for reliable thermostat operation and prevents future dislodgement.
Ensuring Level Installation
Accurate thermostat readings depend on a level installation. Use a bubble level placed on top of the thermostat base to verify horizontal alignment before fully tightening the mounting screws.
Adjust the base slightly if necessary, rechecking the level after each adjustment. Even a small degree of tilt can affect temperature sensing accuracy, leading to inconsistent heating or cooling.
A properly leveled base ensures the thermostat accurately reflects the ambient temperature, optimizing comfort and energy efficiency. Double-check the level in both directions for complete accuracy.
Setting Configuration Dip Switches
Dip switches on the thermostat’s circuit board configure it for specific HVAC systems. Understanding these settings is crucial for proper operation. Refer to the detailed wiring diagram and system compatibility chart in this manual.
Incorrect dip switch settings can cause malfunctions, such as improper heating/cooling cycles or inaccurate temperature readings. Carefully review the settings required for your specific furnace or air conditioner.
Document your chosen settings before powering on the thermostat. These settings determine how the thermostat interacts with your HVAC equipment, ensuring seamless control and optimal performance.
Understanding Dip Switch Settings
Dip switches are small, physical switches used to customize thermostat behavior. Each switch represents a specific function, like heat pump type or fan control. The ‘on’ or ‘off’ position of each switch dictates the thermostat’s response to different system signals.
Consult the thermostat’s wiring diagram for a detailed explanation of each dip switch. Incorrect settings can lead to operational issues. Carefully consider your HVAC system’s configuration before making adjustments.
Properly configured dip switches ensure compatibility and optimal performance. They allow the thermostat to accurately interpret signals from your heating and cooling equipment, delivering consistent comfort.
Configuring for Specific HVAC Systems
Aprilaire thermostats accommodate diverse HVAC setups. Configuration depends on whether you have a conventional system, heat pump, or multi-stage equipment. Dip switch settings and thermostat parameters must align with your system’s specifics.
For heat pumps, configure switches to correctly identify reversing valve control and auxiliary heat operation. Conventional systems require settings for single-stage or multi-stage heating and cooling.
Incorrect configuration can cause improper heating or cooling, or even damage to your HVAC equipment. Always refer to the wiring diagram and system documentation for accurate settings.
Wiring the Thermostat
Proper wiring connects the thermostat to your HVAC system, utilizing color-coded wires and designated terminals for reliable communication and control functionality.
Identifying HVAC Equipment Wiring
Before connecting wires, carefully identify your existing HVAC system’s wiring. Turn off power to the system at the breaker to ensure safety. Document the current wiring configuration, noting the color of each wire and its corresponding terminal on the old thermostat.
Common terminals include R (power), C (common), W (heat), Y (cool), and G (fan). Some systems may have additional wires for auxiliary heat or other functions. Refer to your HVAC system’s documentation or consult a qualified technician if you are unsure about any wiring. Incorrect wiring can damage your equipment or the thermostat.
Always double-check your connections against the Aprilaire wiring diagram specific to your thermostat model.
Connecting Wires to the Thermostat
With the thermostat base mounted and power OFF, carefully connect the identified wires to the corresponding terminals on the Aprilaire thermostat. Use a small screwdriver to loosen the terminal screws and insert the wires securely. Ensure each wire is fully inserted and the screw is tightened to prevent loose connections.
Follow the color-coding and terminal assignments outlined in the Aprilaire installation guide. Double-check each connection against your documented wiring from the old thermostat.
Secure wire connections are crucial for reliable operation; gently tug on each wire to confirm it’s firmly held in place.
Color-Coding and Terminal Assignments
Typically, Red wires connect to 24V power (Rh/Rc), White to heat (W), Yellow to cool (Y), Green to the fan (G), and Black to common (C). However, variations exist based on your HVAC system.
Aprilaire thermostats utilize specific terminal designations; carefully consult your model’s wiring diagram. Rh and Rc terminals may be jumpered if only one transformer wire exists.
Incorrect wiring can damage your equipment. If unsure, consult a qualified HVAC technician. Proper terminal assignment ensures correct system operation and prevents malfunctions.
Secure Wire Connections
After inserting wires into their designated terminals, firmly tighten the terminal screws. Loose connections can cause intermittent operation, inaccurate readings, or complete system failure. Gently tug on each wire to confirm a secure hold, but avoid excessive force.
Ensure no bare wire is exposed beyond the terminal clamp to prevent short circuits. If necessary, strip the wire back slightly to achieve a clean connection.
Double-check all connections against the wiring diagram before proceeding. Secure wiring is crucial for reliable thermostat performance and the longevity of your HVAC system.

Post-Installation & Configuration
Following installation, verify proper system operation, program desired settings, and explore indoor air quality controls for optimal comfort and efficiency.
Initial Power-Up & System Check
Upon completing the wiring and securing the thermostat, restore power to the HVAC system. Observe the thermostat display for proper illumination and initialization. Verify the system responds correctly to temperature adjustments, initiating both heating and cooling cycles.
Confirm the fan operates as expected during each cycle. If the thermostat loses communication with a Control4 system, it will function as a standalone control. Carefully review the display for any error messages, referencing the troubleshooting section of this manual or the Control4 website (www.control4.com/warranty) for assistance. A thorough system check ensures correct installation and optimal performance before proceeding to programming.
Programming the Thermostat
After successful power-up, configure the thermostat by setting the current date and time for accurate scheduling. Access the programming menu to create personalized heating and cooling schedules tailored to your lifestyle and preferences. Utilize the thermostat’s intuitive interface to define different temperature setpoints for various times of the day and days of the week.
Explore the Indoor Air Quality control screens to manage ventilation, humidification, or dehumidification settings. These features enhance comfort and maintain optimal indoor air quality. Refer to the user guide for detailed instructions on advanced programming options and customization possibilities.
Setting Date & Time
Accurate date and time settings are crucial for proper scheduling and thermostat operation. Navigate to the programming menu, typically accessed through the thermostat’s interface, to locate the date and time configuration options. Use the up and down arrows, or similar controls, to adjust the month, day, year, hour, and minute.
Ensure the correct AM/PM designation is selected. Confirm your entries by saving the changes, often with an “Enter” or “Save” button. Proper date and time synchronization enables the thermostat to execute programmed schedules effectively, optimizing comfort and energy efficiency.
Creating Schedules & Preferences
Personalized schedules maximize comfort and energy savings. Access the scheduling menu on your Aprilaire thermostat to define temperature settings for different times of day and days of the week. Create distinct periods – such as “Wake,” “Leave,” “Return,” and “Sleep” – and assign desired temperatures to each.
Many models allow for multiple schedules, catering to varying weekday and weekend routines. Explore preference settings to customize features like temperature display units (Fahrenheit or Celsius) and cycle rates. Save your customized schedule to activate automated temperature control, enhancing your home environment.
Indoor Air Quality Control Screens
Aprilaire thermostats offer advanced indoor air quality (IAQ) management. Utilize the dedicated IAQ control screens to monitor and adjust ventilation, humidification, and dehumidification settings. The ventilation control allows fresh air introduction, improving air circulation. Adjust humidification during dry seasons to maintain optimal humidity levels, preventing discomfort and damage.
Conversely, dehumidification control reduces moisture during humid periods, inhibiting mold growth and enhancing comfort. These features work independently or in conjunction, providing a comprehensive IAQ solution. The thermostat can function standalone, even without Control4 communication, maintaining IAQ control.
Ventilation Control
The Aprilaire thermostat’s ventilation control feature introduces fresh outdoor air into your home, enhancing indoor air quality. This is crucial for diluting pollutants and maintaining a healthier living environment. Adjust ventilation rates based on occupancy, activity levels, and outdoor air quality conditions. Proper ventilation minimizes stale air and reduces the concentration of allergens, dust, and odors.
Utilize the thermostat’s interface to schedule ventilation cycles, optimizing energy efficiency while ensuring consistent fresh air supply. Consider integrating with outdoor temperature sensors for automated adjustments, maximizing comfort and IAQ performance. Regular ventilation contributes to a healthier and more comfortable home.
Humidification/Dehumidification Control
Aprilaire thermostats offer precise control over indoor humidity levels, enhancing comfort and protecting your home’s structure. Maintaining optimal humidity prevents issues like condensation, mold growth, and dry skin. The system allows for scheduled humidification during colder months and dehumidification during warmer, more humid periods.
Configure humidity setpoints based on your preferences and climate. Integration with whole-house humidifiers and dehumidifiers ensures consistent and efficient moisture management. Monitor humidity levels via the thermostat’s display and adjust settings accordingly. Proper humidity control contributes to a healthier, more comfortable, and structurally sound home environment.

Troubleshooting & Support
This section provides solutions for common issues, like power failures or communication problems, and directs users to Aprilaire’s warranty and resource center.
Thermostat Not Powering On
If your Aprilaire thermostat fails to power on, begin by verifying the power supply at the furnace or HVAC equipment. Ensure the system’s breaker hasn’t tripped and that the power switch is in the ‘on’ position.
Next, carefully inspect the thermostat wiring, confirming all connections are secure and correctly placed on the terminals. A loose wire is a frequent cause of power issues.
Double-check the C-wire (common wire) connection, as many Aprilaire models require it for consistent power. If a C-wire isn’t present, a C-wire adapter might be necessary. Finally, consult the installation manual or Aprilaire’s support resources for model-specific troubleshooting steps.
Communication Issues with Control4 System
If your Aprilaire thermostat experiences communication problems with a Control4 system, first verify the network connection for both devices. Ensure both are online and can access the same network.
Check the Control4 system’s programming to confirm the thermostat is correctly added and configured as a device. Review the Control4 documentation for specific integration instructions.
Sometimes, a simple reboot of both the thermostat and the Control4 controller can resolve connectivity issues. If problems persist, consult the Control4 website (www.control4.com/warranty) or Aprilaire’s user guide for advanced troubleshooting steps and support resources.
Finding Additional Resources & Warranty Information
For comprehensive support beyond this manual, Aprilaire provides extensive resources online. Visit the official Aprilaire website for FAQs, detailed product specifications, and downloadable documentation related to your specific thermostat model, like the 8570.
Control4 users should also consult the Control4 website (www.control4.com/warranty) for integration guides and troubleshooting specific to their system.
Warranty details for your Aprilaire thermostat are available in the product packaging and online. Ensure you register your product to activate the warranty and access potential claim support.


Leave a Reply
You must be logged in to post a comment.