pro1 t701 thermostat manual

Pro1 T701 Thermostat Manual: A Comprehensive Guide
This manual details the Pro1 T701 thermostat, covering installation, operation, and troubleshooting, aligning with French Service Civique information portals.
Welcome to the Pro1 T701 thermostat – a sophisticated climate control solution designed for comfort and energy efficiency. This thermostat, much like the structured framework of France’s Service Civique program, operates on principles of responsiveness and user control. It allows precise temperature management within your home or office, adapting to your lifestyle and preferences.
The Pro1 T701 isn’t merely a temperature regulator; it’s a system built for intuitive operation, mirroring the accessible information portals of the DRAJES and SDJES. It offers programmable schedules, remote access capabilities (with Wi-Fi models), and smart learning features. This manual will guide you through every aspect of the thermostat, from initial setup and wiring to advanced programming and troubleshooting, ensuring a seamless experience. Like accessing your Service Civique account via ELISA, understanding your thermostat is key to maximizing its benefits.
What’s Included in the Box?
Upon opening your Pro1 T701 thermostat package, please verify the presence of all listed components. Similar to ensuring all necessary documentation for a Service Civique mission application, a complete inventory is crucial for a smooth start. You should find the Pro1 T701 thermostat unit itself, a mounting base plate for wall installation, and detailed installation screws and wall anchors.
Additionally, the box contains a quick-start guide offering basic setup instructions – akin to the introductory information on the Service Civique website. A comprehensive user manual (this document!) provides in-depth explanations of all features. Wire labels are included to simplify the wiring process, and, depending on the model, you may also find batteries. If any items are missing, please contact customer support immediately, mirroring the support available through the Service Civique extranet.
Installation & Setup
Proper installation, like a well-structured Service Civique application, is key. This section guides you through mounting, wiring, and initial power-up procedures.
Mounting the Thermostat Base
Before beginning, ensure power to your HVAC system is completely OFF at the breaker. Select a location for the thermostat base that is away from direct sunlight, drafts, and other sources of temperature interference. The ideal height is approximately 5 feet from the floor.
Using the provided mounting screws, securely attach the baseplate to the wall. A level is recommended to ensure accurate temperature readings. If mounting to drywall, use appropriate wall anchors. Carefully feed the thermostat wires through the opening in the baseplate. Double-check that the wires are not pinched or damaged during this process.
Once the wires are connected (refer to the wiring diagram), gently push any excess wire back into the wall. Finally, snap the thermostat base onto the mounted plate, ensuring it clicks securely into place. This process, much like a Service Civique mission, requires careful preparation.
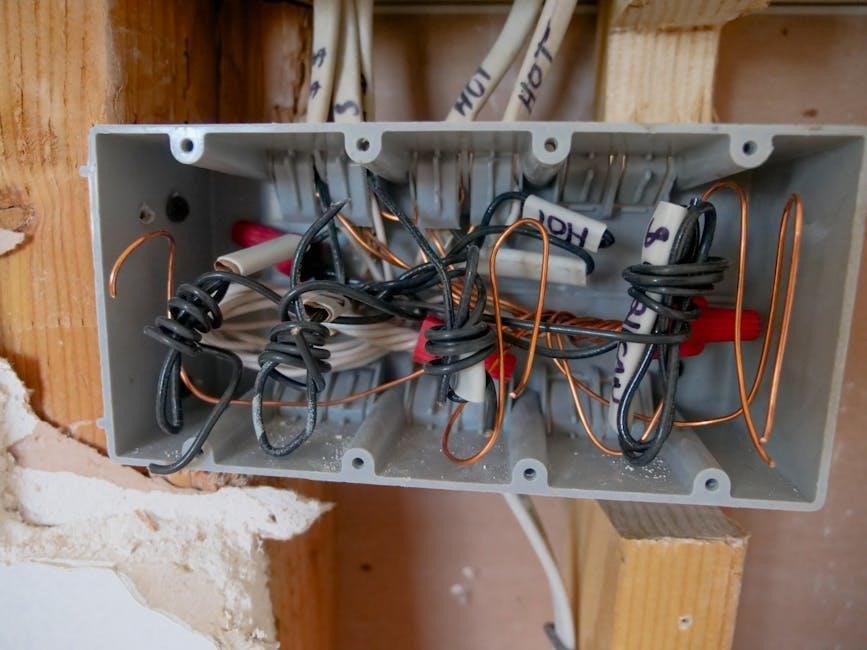
Wiring Diagram & Connections
Caution: Incorrect wiring can damage your HVAC system. If unsure, consult a qualified technician. Refer to the detailed wiring diagram included with this manual. Typically, you’ll find terminals for Rh (hot), Rc (cooling), W (heat), Y (cool), G (fan), and C (common).
Connect each wire to the corresponding terminal on the thermostat base, ensuring a secure connection. Use a small screwdriver to tighten the terminal screws. The ‘C’ wire is crucial for consistent power; without it, some features may not function correctly.
Double-check all connections against the diagram before proceeding. Similar to the structured framework of the French Service Civique, precise connections are vital for proper operation. A miswired connection can lead to system malfunction, just as a poorly planned mission can fail.
Powering On & Initial Setup
After wiring, restore power to your HVAC system at the breaker. The Pro1 T701 should power on automatically, displaying the welcome screen. The initial setup wizard will guide you through essential configurations. First, you’ll be prompted to select your system type – furnace, heat pump, or electric baseboard.
Next, set your location for accurate weather data. This is similar to the geographical focus of the French Service Civique’s regional delegations (DRAJES and SDJES). Then, configure your preferred temperature units (Fahrenheit or Celsius).
Finally, connect to your Wi-Fi network (optional) for remote control. Follow the on-screen instructions carefully. A successful setup ensures optimal performance and access to all features.
Understanding the Display & Controls
The Pro1 T701 features an intuitive LCD screen and buttons, mirroring the accessible information portals of the French Service Civique.
LCD Screen Icons & Indicators
The Pro1 T701 thermostat’s LCD screen utilizes a series of icons to clearly communicate its current status and operation. A flame icon indicates the heating system is actively engaged, while a snowflake signifies cooling mode is running. A fan icon displays the fan’s operational state – auto or on. The “Wi-Fi” symbol confirms a successful connection to your home network, enabling remote control via the mobile app.
A battery icon alerts you to low battery levels, if applicable. The “Hold” icon signifies a temporary override of the programmed schedule. Temperature displays show both the setpoint and the current room temperature. Error codes, if present, will flash to indicate a system malfunction, requiring troubleshooting. These indicators, much like the clear information on French Service Civique portals, provide essential feedback at a glance.
Button Functions Explained
The Pro1 T701 thermostat features intuitive button controls for easy operation. The “Up” and “Down” buttons adjust the desired temperature setpoint. Pressing the “Mode” button cycles through available operating modes: Heat, Cool, Auto, and Off. The “Fan” button controls the fan operation, selecting between “Auto” and “On” settings.
A “Menu” button accesses the thermostat’s programming options, allowing you to set the date, time, and schedule. The “Select” or “Enter” button confirms selections within the menu. Similar to navigating the French Service Civique website for mission details, these buttons provide direct access to core functionalities. Understanding these functions ensures optimal control and comfort, mirroring the clarity found in official service information.
Navigating the Menu System
Accessing the Pro1 T701’s menu is done via the “Menu” button. Use the “Up” and “Down” arrows to scroll through options like “Set Date,” “Set Time,” “Schedule,” and “System Settings.” Press “Select” to enter a chosen menu. Within each menu, use the arrows to adjust values, and again, “Select” confirms your changes.
Returning to the main menu or exiting a setting is typically done with a “Back” or “Cancel” button (if equipped), or by repeatedly pressing “Menu.” This system, much like navigating the French Service Civique portal for mission applications, requires a sequential approach. Remember to save changes before exiting to ensure settings are retained, mirroring the importance of confirming submissions.
Programming Your Thermostat
Customize your comfort! This section guides you through setting schedules, temporary holds, and overrides, similar to managing Service Civique commitments.
Setting the Date & Time
Accurate date and time settings are crucial for proper scheduling and operation of your Pro1 T701 thermostat. To begin, access the “Settings” menu using the navigation buttons. Locate the “Date/Time” option and select it. You’ll then be prompted to adjust the year, month, and day. Use the up and down arrow buttons to modify each value, confirming each selection by pressing the “Select” or “Enter” button.
Next, set the time. Adjust the hour and minute, again using the arrow buttons and confirming each change. Ensure you correctly indicate AM or PM if your thermostat uses a 12-hour clock format. Like managing commitments within the Service Civique framework, precision is key. Once the date and time are accurately set, save your changes. The thermostat will now operate based on the correct temporal parameters.
Creating a Heating/Cooling Schedule
The Pro1 T701 allows for customized heating and cooling schedules to optimize comfort and energy savings. Access the “Schedule” menu via the main navigation. You can typically create separate schedules for weekdays and weekends, or even individual days. Begin by defining a “Wake” period – the time you want heating or cooling to activate in the morning. Set the desired temperature for this period.
Next, program a “Leave” period for when the house is unoccupied, setting a lower (for heating) or higher (for cooling) temperature. Finally, define “Return” and “Sleep” periods with corresponding temperature settings. Similar to organizing Service Civique missions, careful planning is essential. Review your schedule carefully, ensuring it aligns with your daily routine. Save the schedule to activate it, and enjoy automated climate control!
Temporary Holds & Overrides
The Pro1 T701 offers temporary hold and override features for immediate climate adjustments, much like managing urgent Service Civique volunteer requests. A “Hold” temporarily suspends the programmed schedule, maintaining a set temperature for a specified duration – hours or until the next scheduled period. An “Override” instantly adjusts the temperature, reverting to the schedule at the next programmed change.
To initiate a hold, select “Hold” from the main menu and enter the desired temperature and duration. For an override, simply adjust the temperature using the up/down buttons; the system will indicate it’s in override mode. These features are ideal for unexpected events or changes in occupancy. Remember to cancel a hold if your plans change to resume the programmed schedule efficiently.
Advanced Features
The Pro1 T701 boasts Wi-Fi connectivity, smart learning, and geofencing, mirroring the responsive nature of France’s Service Civique portal.
Wi-Fi Connectivity & Mobile App Control
Connecting to Your Home Network: The Pro1 T701 seamlessly integrates with your 2;4GHz Wi-Fi network, enabling remote control and monitoring. Access the thermostat’s settings menu and select the Wi-Fi option. A list of available networks will appear; choose yours and enter the password.
Mobile App Installation & Pairing: Download the dedicated Pro1 Smart Home app (available on iOS and Android). Create an account or log in. Follow the in-app instructions to pair your thermostat – typically involving scanning a QR code on the device or manually entering its serial number.
Remote Control Features: Once connected, you can adjust the temperature, create schedules, and view energy usage data from anywhere with an internet connection. The app mirrors the thermostat’s interface, offering convenient control, much like accessing Service Civique information online.
Smart Learning & Geofencing
Adaptive Learning Technology: The Pro1 T701 employs smart learning algorithms to understand your heating and cooling preferences. Over time, it analyzes your manual adjustments and automatically creates a personalized schedule, optimizing comfort and energy efficiency. This process requires a week of typical usage to establish baseline patterns.
Geofencing Setup: Utilizing your smartphone’s location, the geofencing feature detects when you leave or return home. You can configure the thermostat to automatically switch to an energy-saving “Away” mode when you’re outside a defined radius and revert to your preferred settings upon your return, similar to accessing Service Civique missions nearby.
Customization & Control: Adjust the geofencing radius and temperature settings for both “Home” and “Away” modes within the mobile app. This ensures optimal comfort and minimizes energy waste, even with unpredictable schedules.
Energy Saving Modes & Settings
Eco Mode: Activate Eco Mode for a pre-set temperature reduction, minimizing energy consumption while maintaining a comfortable environment. This mode is ideal for extended periods away or during milder weather, functioning similarly to the structured framework of the Service Civique program.
Scheduled Backlight Dimming: The Pro1 T701 features adjustable backlight dimming settings. Schedule the display to dim or turn off during periods of inactivity, reducing energy usage and minimizing light pollution.
Filter Change Reminders: The thermostat tracks operating hours and provides timely reminders to replace your air filter. A clean filter ensures optimal HVAC system performance and energy efficiency. Configure reminder frequency within the settings menu.
Smart Recovery: This feature intelligently anticipates temperature changes and begins heating or cooling in advance, ensuring your desired temperature is reached precisely when scheduled.
Troubleshooting Common Issues
This section provides solutions for typical problems, like power failures or connection issues, mirroring the support found on Service Civique portals.
Thermostat Not Powering On
If your Pro1 T701 thermostat fails to power on, begin with the simplest checks. First, ensure the circuit breaker controlling the thermostat’s power supply hasn’t tripped. Reset it if necessary. Next, verify the thermostat is securely mounted to the baseplate, establishing a solid electrical connection.
Inspect the wiring connections, ensuring all wires are firmly inserted into their respective terminals, referencing the wiring diagram. If the thermostat utilizes batteries, confirm they are fresh and correctly installed, observing proper polarity. Consider that, similar to accessing support on platforms like Service Civique, a complete power cycle – turning off power at the breaker for several minutes – can sometimes resolve the issue.
If problems persist, consult a qualified HVAC technician.
Incorrect Temperature Readings
If the Pro1 T701 thermostat displays inaccurate temperature readings, several factors could be at play. First, ensure the thermostat isn’t directly exposed to sunlight, drafts, or heat-generating appliances, as these can skew the sensor readings. Verify the thermostat is level; an unlevel installation can affect accuracy.
Compare the thermostat’s reading with a known accurate thermometer placed nearby. If a significant discrepancy exists, try recalibrating the thermostat through the menu settings – consult the ‘Navigating the Menu System’ section for instructions. Like troubleshooting access issues on platforms such as Service Civique, a reset might be needed.
If recalibration fails, professional HVAC assistance is recommended.
Wi-Fi Connection Problems
Experiencing difficulty connecting your Pro1 T701 thermostat to Wi-Fi? First, confirm your home network is functioning correctly and that the thermostat is within range of your router. Double-check you’ve entered the correct Wi-Fi password during setup – case sensitivity matters! Restarting both your router and the thermostat can often resolve temporary connectivity issues, similar to resetting login credentials on platforms like Service Civique’s extrenet ELISA.
Ensure your router’s firewall isn’t blocking the thermostat’s connection. Consult your router’s manual for instructions on adjusting firewall settings.
If problems persist, try a factory reset (see ‘Factory Reset Instructions’) and re-attempt the Wi-Fi setup process.
Maintenance & Care
Regular cleaning and occasional battery checks (if applicable) ensure optimal performance, mirroring the upkeep required for platforms like Service Civique’s portals.
Cleaning the Thermostat
To maintain the Pro1 T701 thermostat’s appearance and ensure accurate operation, regular cleaning is recommended. Always begin by completely powering off the thermostat at the breaker to avoid electrical shock. Gently remove the thermostat faceplate from the base – consult the ‘Understanding the Display & Controls’ section if needed.
Use a soft, dry microfiber cloth to wipe down the faceplate and base. Avoid abrasive cleaners, solvents, or excessive moisture, as these can damage the LCD screen and internal components. For stubborn smudges, lightly dampen the cloth with water, ensuring it’s wrung out thoroughly before use.
Pay particular attention to cleaning around the buttons and display. Once dry, carefully reattach the faceplate to the base. Like maintaining access to Service Civique portals, consistent care extends the lifespan of your device.
Battery Replacement (if applicable)
The Pro1 T701 thermostat may utilize batteries for backup power during outages or, in some models, as its primary power source. To check battery status, navigate to the ‘Settings’ menu on the LCD screen – refer to ‘Navigating the Menu System’ for detailed instructions. If the display indicates low battery, replacement is necessary.
Power off the thermostat at the breaker before proceeding. Locate the battery compartment, typically on the thermostat base. Carefully remove the old batteries, noting the correct polarity (+ and -). Install fresh batteries of the specified type (usually AA or AAA – see ‘Technical Specifications’).
Ensure proper contact and securely close the battery compartment. Like accessing Service Civique extranets, correct procedure is vital. Test the thermostat’s operation after replacement;
Factory Reset Instructions
A factory reset restores the Pro1 T701 thermostat to its original default settings, erasing all personalized programming, schedules, and Wi-Fi configurations. This is useful for troubleshooting persistent issues or preparing the thermostat for a new user. Access the reset function through the ‘Settings’ menu on the LCD screen.
Navigate to ‘Advanced’ or ‘System’ options, then select ‘Factory Reset’ or ‘Restore Defaults’. The thermostat will likely prompt for confirmation – carefully read the warning before proceeding, as this action is irreversible.
Similar to managing Service Civique agreements via ELISA, confirm the reset. The thermostat will power cycle and return to its initial setup screen. You will then need to reconfigure the date, time, and desired settings.

Technical Specifications
The Pro1 T701 operates within a standard temperature range, requires typical household power, and features compact dimensions—similar to Service Civique program details.
Operating Temperature Range
The Pro1 T701 thermostat is designed to function reliably within a broad spectrum of ambient temperatures, ensuring consistent and accurate climate control in diverse environments. Its optimal operating temperature range is between 32°F and 104°F (0°C and 40°C).
However, the thermostat can survive exposure to temperatures slightly outside this range during storage or brief power outages, typically down to 14°F (-10°C) and up to 122°F (50°C) without sustaining permanent damage.
It’s crucial to avoid prolonged exposure to extreme temperatures, as this could affect the accuracy of the temperature sensor and potentially shorten the lifespan of the device. Similar to the structured framework of programs like Service Civique, maintaining optimal conditions ensures peak performance.
Power Requirements
The Pro1 T701 thermostat operates on a standard 24VAC (Volts Alternating Current) power supply, commonly provided by your home’s heating and cooling system control board. It is not designed for direct connection to 120VAC or 240VAC mains power.
A dedicated C-wire (common wire) is highly recommended for consistent power, especially when utilizing advanced features like Wi-Fi connectivity and the mobile app. Without a C-wire, the thermostat may intermittently draw power from the heating/cooling system, potentially causing operational issues.
Similar to the reliable infrastructure supporting initiatives like Service Civique, a stable power source is essential for consistent and dependable performance. Battery backup is not included; reliance on system power is standard.
Dimensions & Weight
The Pro1 T701 thermostat boasts a compact design, measuring 4.7 inches in width, 3.3 inches in height, and 1.2 inches in depth. These dimensions ensure it will seamlessly integrate with most wall configurations without being obtrusive. The unit’s faceplate is constructed from durable, high-quality plastic for longevity and aesthetic appeal.
Regarding weight, the thermostat is remarkably lightweight, tipping the scales at approximately 6.5 ounces (184 grams) without packaging. This minimal weight simplifies the installation process, reducing strain on wall anchors.
Like the streamlined processes of organizations such as Service Civique, the T701 prioritizes efficiency in both form and function.


Leave a Reply
You must be logged in to post a comment.